Hello!
In this article I will be explaining layers and blending modes.
We will focus on Photoshop/ GIMP / other Photo editing suites and SAI's unique layer styles.
Intro to Layers
Layers are basically pieces of digital 'paper' that can be stacked on top of each other. They're also handy because you can erase parts of the layer, or even control the opacity so that previous layers can show through. Or not.
Layers are really useful because you can organize your digital art, add effects without destroying the original, define values and paint on top, colorize things, and mask things. Using layers allow you to work pretty much risk free, provided that you keep making new ones.
However, things can get super messy if you have 3000 layers and you have no idea what each of them do.
Oh darn it, where the heck is my character's eye? I lost it. 
Basic Layer Components
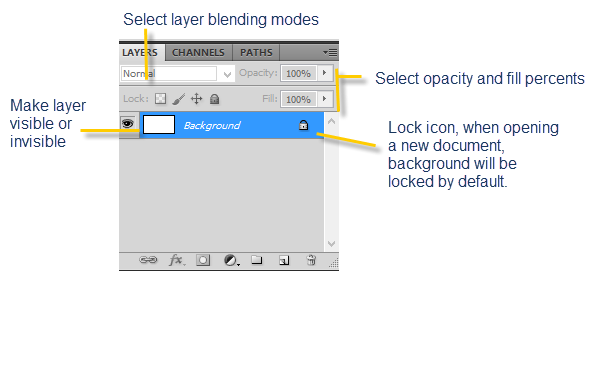
There are different clicky buttons that help you set up your layers.
It is useful to know what everything does!
For my examples, I will be using Photoshop. You can use any other image editing program. You are likely to have all the options, or at least most of them.
YAY.
Right now, we are looking at just the simple details.
Do you see those awesome features? Woot.
Blending Modes: Really awesome things that transform your layers into magical layers. A future article will be written that will explore and explain what you can do with those.
The eye controls visibility. Useful if you get sloppy and have three thousand layers and you have no idea what is on any of them. It is awesome if you don't allow that to happen. Be smart, and merge down when you are ready!

The opacity of the layer is different than the brush opacity. If you change the opacity and fill percent, you will control the opacity of everything on the layer.
Opacity is the opaque-ness. Lower opacity, less opaque. More see through!
Difference between Fill and Opacity: Both control layer's transperancy. If you have no layer styles applied, both will do the same thing.
Opacity controls everything on the layer, and fill will only control layer content. What does that mean? If you have your layer styles applied, you can make everything but the layer style invisible. That's useful if you duplicate layers and work with that in photomanipulation or webdesign.
Layer Opacity Continued
And like it says, when opening a new document, a background layer will be created and locked.
Double click, rename if you like, and select ok when prompted to do stuff to the new layer.
Sweet.
Now we can look at more things.
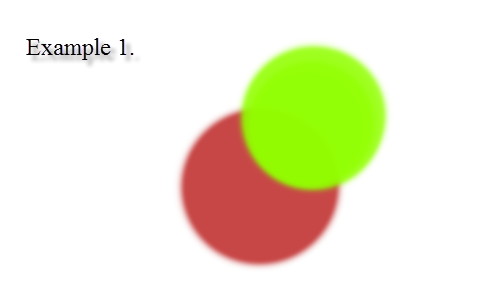
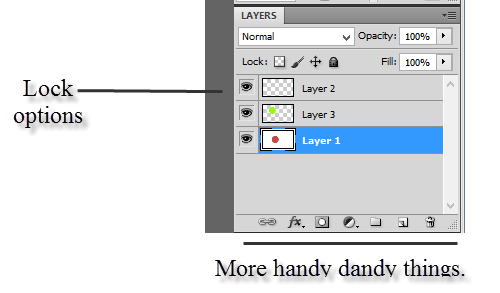
If I two dots on different layers, I can change the opacity of the different layers without affecting the other.
Using layers is awesome because prevents mistakes and also helps set up different elements in design and art. I can also move things on one layer and nothing happens to the other.
The Usefulness of Layers
- Working on separate layers for background, foreground, middle ground, etc. Much better than doing it on one layer and then having to undo everything if you make a mistake. That's just annoying and easier to mess up. What if you want to transform an element without disturbing everything else? Exactly.
- You can set different effects for different layers. Make your layers as complex and useful as you wish.
- You can keep track of things and label the layer. Double click on the layer name(default layer 1, 2, 3 etc) , and rename. That's awesome.
- You can switch visibility of selective things if you want to. Good for making lineart lighter, or some garish color less annoying to the eyes.
- Text, vector shapes, smart objects, all possible and they are made and controlled using layers.
More useful things to see!
Do you see the words lock?
Awesome.
Now the first option locks transparent pixels. This is awesome if you are colorizing lines, or shapes already there without coloring outside the lines/shapes.
The second locks the image pixels: This locks out brushing things in, and locks all the things in the image.
The third locks the position, this means you cannot move whatever you put on the layer.
The fourth lock locks everything. The big bad lock.
The fourth lock icon will appear next to the layer panels when things are locked.
You don't get a brush when the image pixels are locked. :c
What things do, once more.
The icons at the bottom:
1: The link icon links layers together. If you select more than one, you can click that link icon and they will be linked. Selecting more than one layer is achieved by selecting one layer(see how it is blue?) and then hold shift and click on another, or even more than one.
Linking layers allows them to be treated as one group without having to merge.
FX: Those are the delicious layer styles. Those are different than layer blending modes. Layer styles allow you to add shadows, bevels, imbossses, and more. Very fancy. Good for adding polish to your designs.
Circle in Grey Box: Layer Masks. Basically allows you to erase parts of images, and reveal and hide parts of a layer as you chose.
A tutorial on layer masking!
Half a moon colored in: This allows you to add a new fill or adjustment layer. That means hue, saturation, levels, brightness, etc. Anything under the adjustment layer will have the adjustments applied. If it's on top, then well, no adjustments. 
Folder: This allows you to group your layers. You can open and close the folder. Allows you to sort your layers. Think of it as a filing folder, alright? 
Sticky note: Create a new layer! Yay.
Trashcan: Delete a layer.
Useful things
If you have a layer fully opaque on top of another layer, things underneath will be hidden. That is why all new layers will be default transparent.
Otherwise nothing helpful will happen. Unless you turn down overall opacity of the layer!
Photoshop Shortcuts that are related to layers!

{adobe.com) 


